Ensemble Fundamentals
Some things can only be taught in context.
Back when I was a percussion tutor shadowing my school’s Wind Ensemble, the whole reason my job existed was because the student percussionists were struggling with the fundamentals of ensemble playing.
Why were they always either dragging or rushing?
Why was it so difficult to play a beat as a section exactly together?
Why did the conductor always say they needed to make more eye contact?
Why did instruments never seem to be in the same place or comfortable to play?
Some lessons are unique to group settings and will only make sense or come into effect when performers are in a space where it can be demonstrated. Most band directors and conductors won’t have time to guide percussionists through these aspects because they need to focus on the larger ensemble. Unfortunately, this means it’s easy for these fundamentals to be missed and for the ensemble’s sound to suffer as a result.
To combat this, here are three ensemble fundamentals inexperienced percussionists should look out for!
1. The Tyranny of Distance
When you break it down, music is just sound waves.
These sound waves react differently to each performance space. In purpose-built concert halls, the architecture helps funnel the sound out into the audience. In generic multi-purpose halls or outdoor performances though, sound will dissipate in all directions. Consequently, percussionists must learn how to combat sluggish acoustics and the ‘tyranny of distance’.
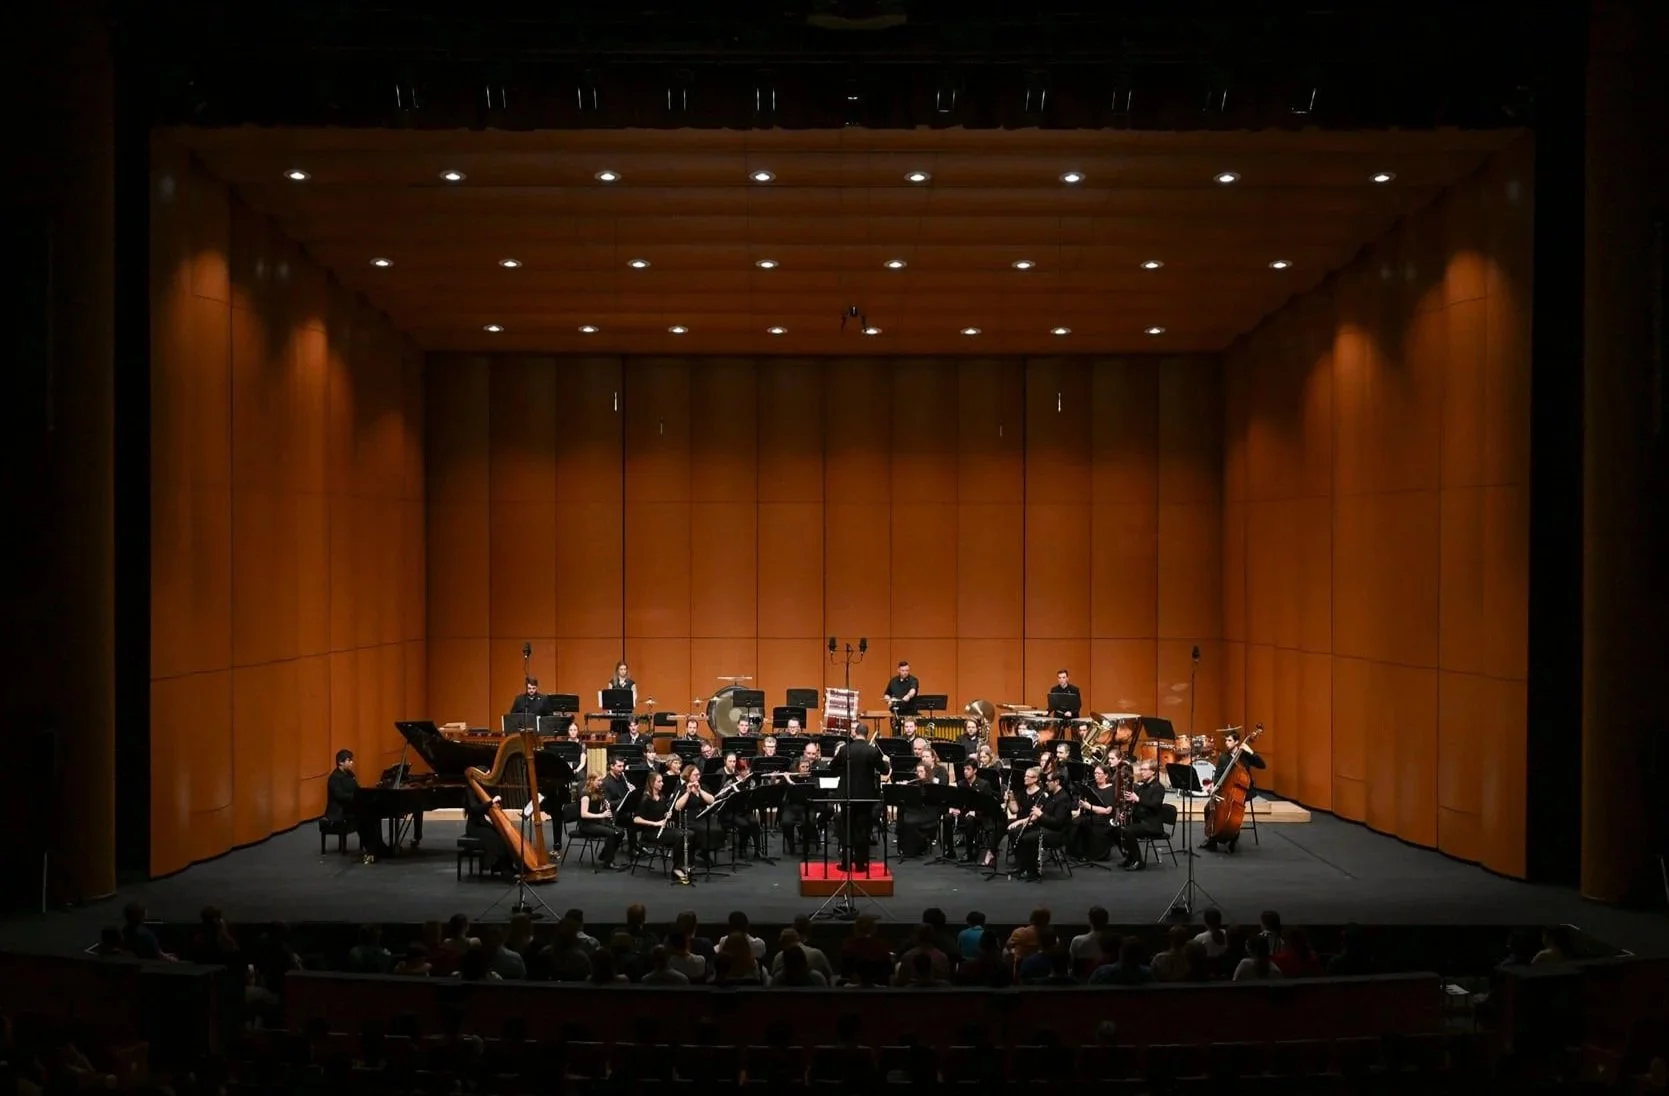
A purpose-built concert hall stage. The shape of the walls helps direct the sound.
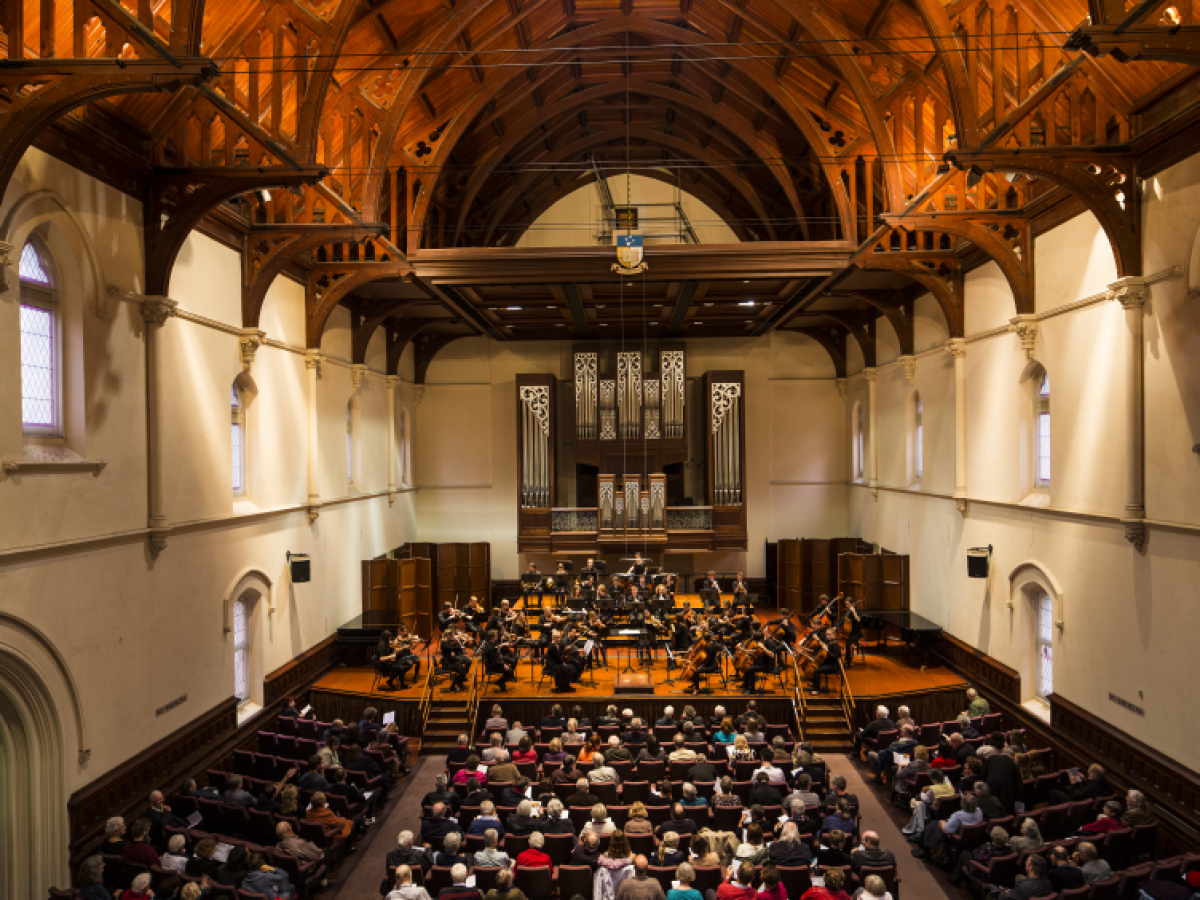
A more generic, open stage. Its shape allows sound to escape upwards and sideways, rather than all being directed at the audience.
Situated at the very back of the ensemble, there are several rows of musicians between the percussionists and the conductor. There’s an even greater distance between the percussionists and the back of the audience. So how do you make sound travel further while also being in time with the rest of the ensemble?
Simply put:
If you play with what you hear, you’ll be late.
You must learn to play with what you can SEE!
In essence, this means staring down the conductor like your life depends on it. It means utilizing your peripheral vision so you can see the arm movements of other percussionists. It also means learning how to anticipate the beat.
To achieve the latter, I used to have my students play The Anticipation Game. The game has two steps:
Set a beat (metronome, clicking sticks, etc.)
Ask students to jump and land on 1
Students will want to start preparing their jump on 1. But if they do, they’ll automatically be late. The Anticipation Game helps them feel the weight of the downbeat and learn to breathe before playing.
Playing The Anticipation Game as a group is extremely effective at getting a percussion section to play together and master those tricky collective downbeats.
Give it a go!
2. Sight-lines and Spatial Awareness
Percussionists are constantly shifting their eyes between three points: the music, their instrument(s), and the conductor.
Unlike most other musicians, percussionists are usually separated from their instrument(s) by the length of a mallet or stick. This can make less experienced percussionists feel vulnerable because their spatial awareness is not yet attuned. Striking out at an instrument can feel like playing into the void!
As such, I often see student percussionists placing their music stands low so it’s closer to the instrument(s). Unfortunately, this also makes it harder to see the conductor.
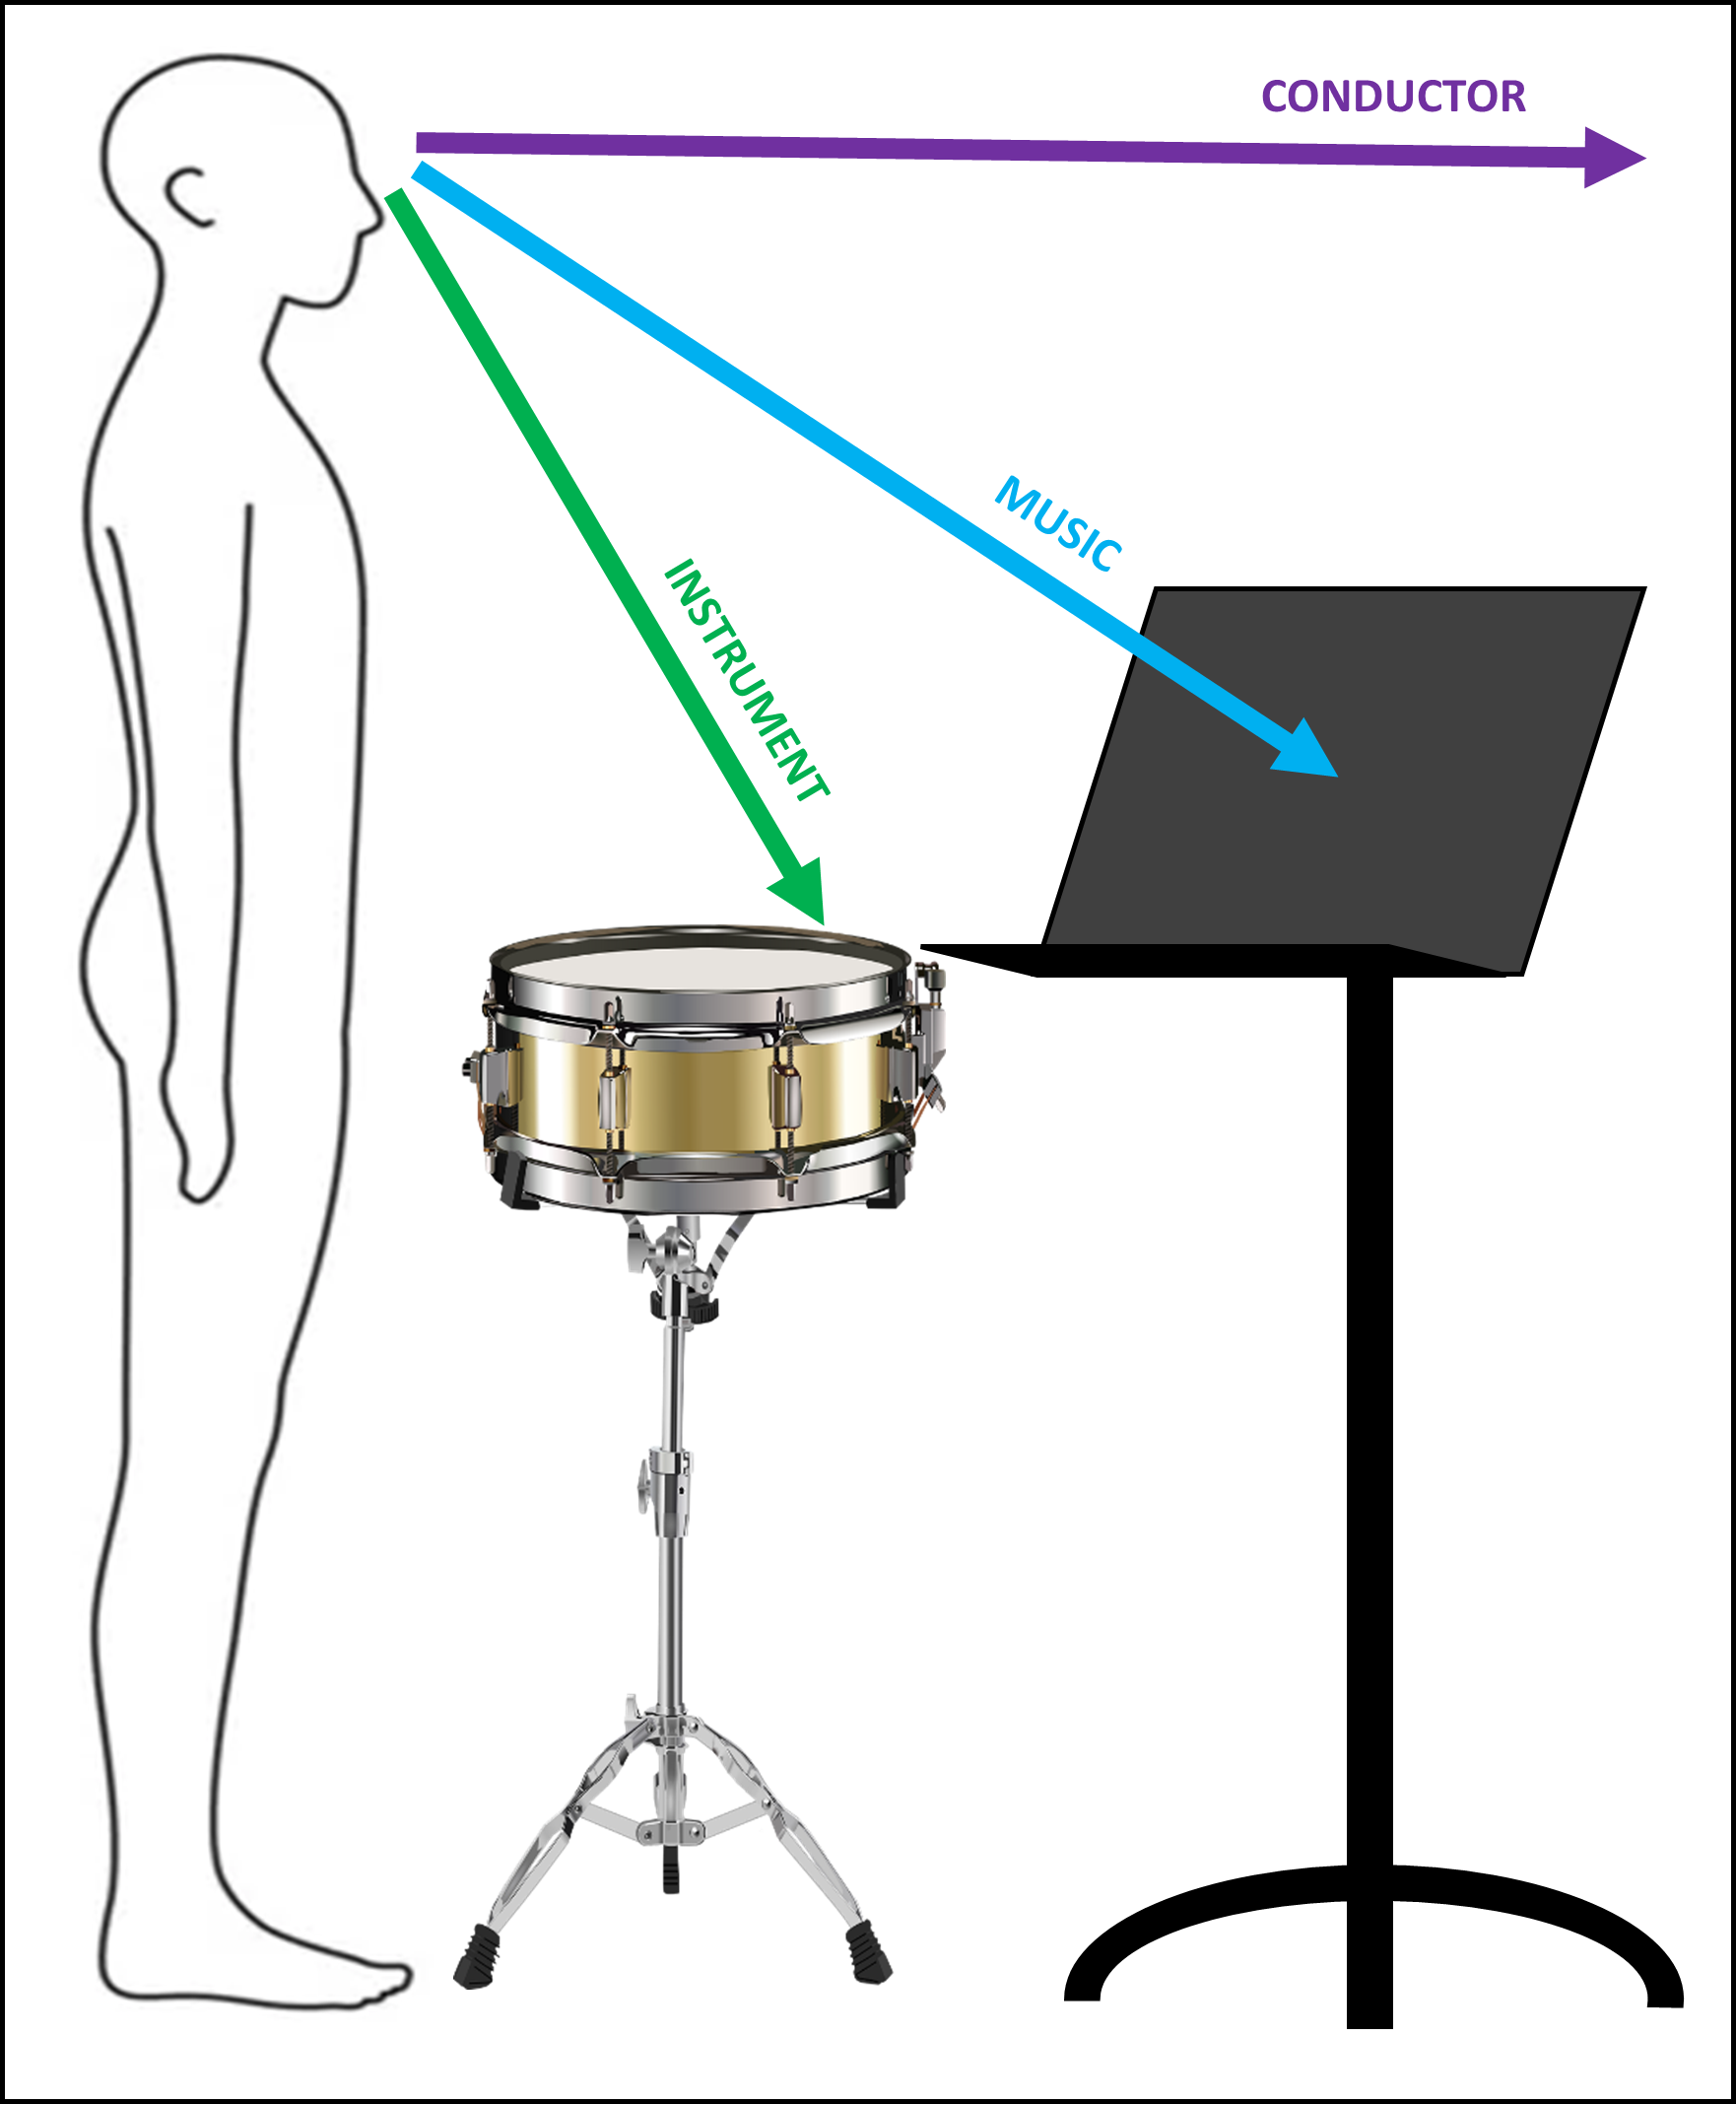
Diagram of a percussionist at a snare drum. The music stand is low. Distance between ‘Music’ and ‘Instrument’ is reduced, but view of the ‘Conductor’ is correspondingly placed further away.
By placing the music stand low you reduce the distance your eyes have to travel between the instrument(s) and sheet music. But this focuses the majority of your sight-line down, angling your neck so you have to make a full motion to look back up at the conductor. Moving quickly between these points can be disorientating and may cause you to lose your place in the sheet music. Most inexperienced percussionists will therefore spend the majority of their time not looking at the conductor, relying instead upon what they hear other musicians playing around them. This in combination with the ‘tyranny of distance’ and you have a recipe for rushing or dragging.
Raising the music stand corrects these problems
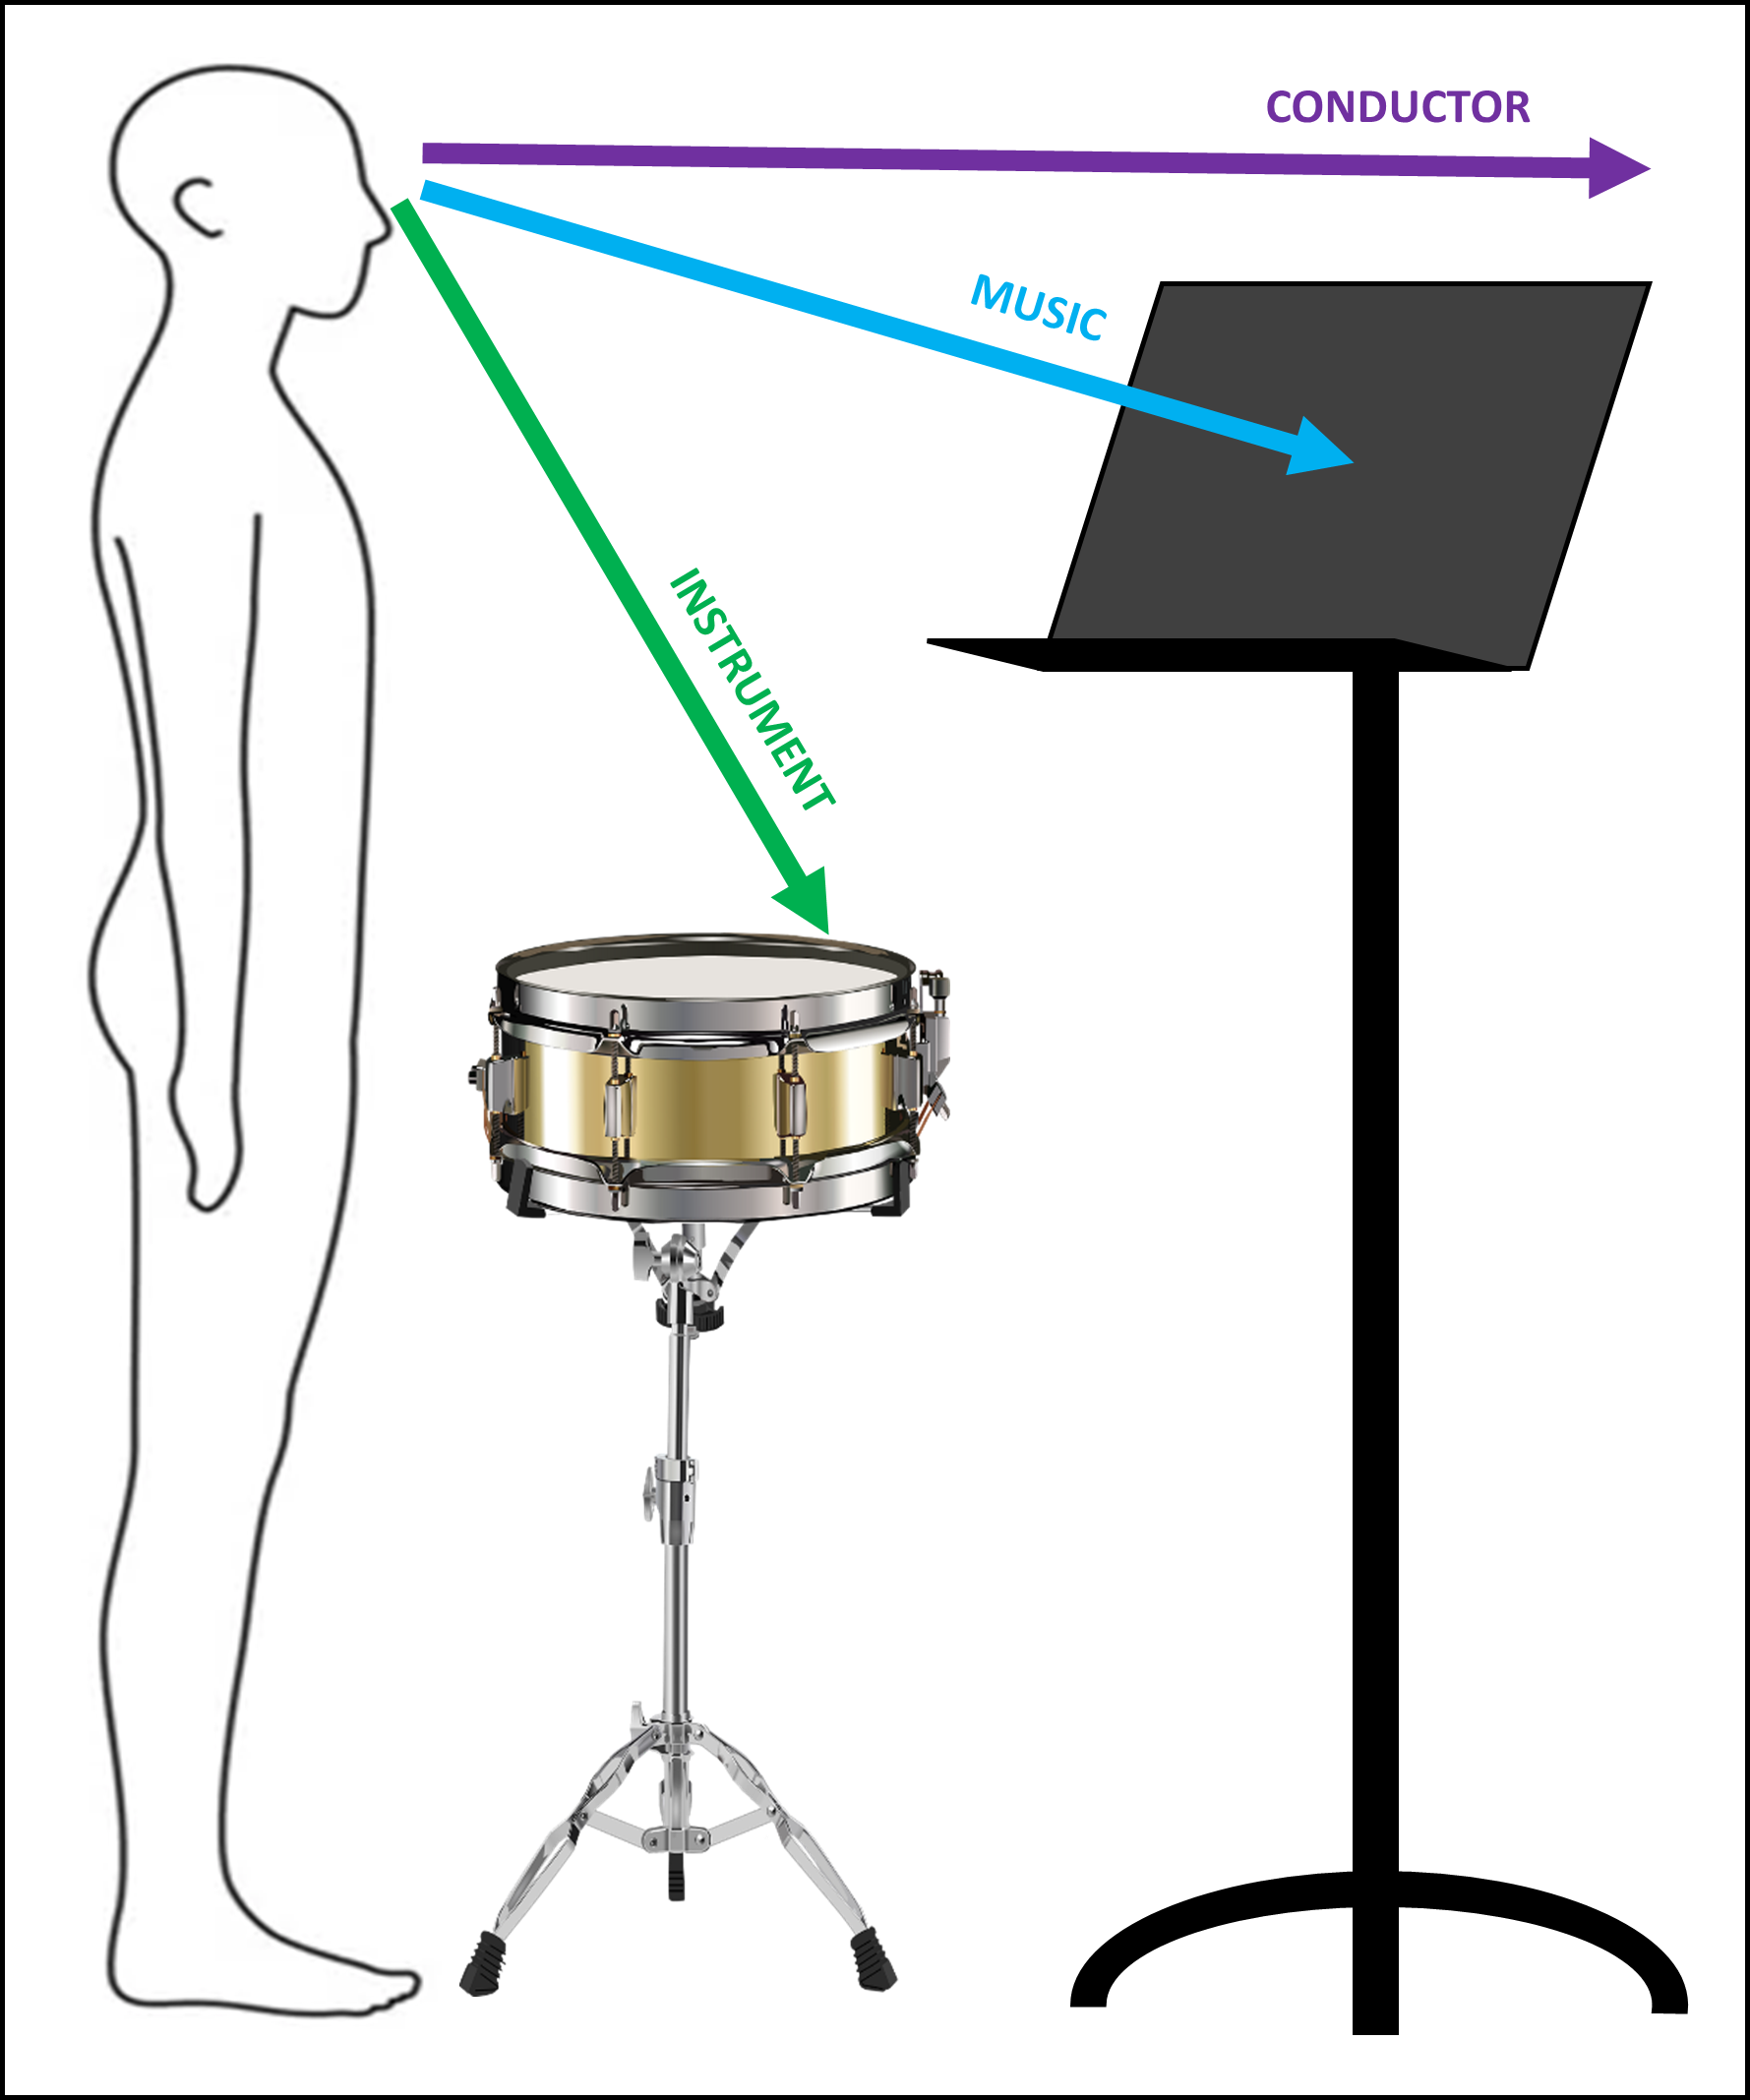
Diagram of a percussionist at a snare drum. The music stand is high. Distance between ‘Conductor’ and ‘Music’ is reduced, and the ‘Instrument’ can be checked with peripheral vision.
By reducing the distance your eyes have to travel between the conductor and sheet music, you are less likely to lose your place. It will be easier to look more frequently at the conductor and thus easier to play in time. It also encourages better posture and use of peripheral vision to glance down at the instrument (as opposed to moving your entire head). This by extension begins training your spatial awareness.
3. Section layouts
Before we get into this one, I should clarify that there are a few different approaches to percussion layouts depending on the musical tradition it draws upon, repertoire requirements, and/or performance space. That said, what I present here is a useful skeleton based on symphony and wind orchestra set-ups which can be adapted to purpose.
Where different percussion instruments are placed in relation to the rest of the ensemble has a big impact on how that ensemble sounds when performing. Rather than being lots of individual instruments, percussion as a section is used to bolster the music produced by the brass, woodwinds, and/or strings; reinforcing the bass line, driving syncopation, adding colour to melody lines, etc.
As such, a typical percussion layout reflects these relationships and places the relevant percussion nearer those instrument groups. Using this layout provides consistency for performers, assists stage managers with event planning, and allows a clearer view of instruments for both percussionists and the audience.
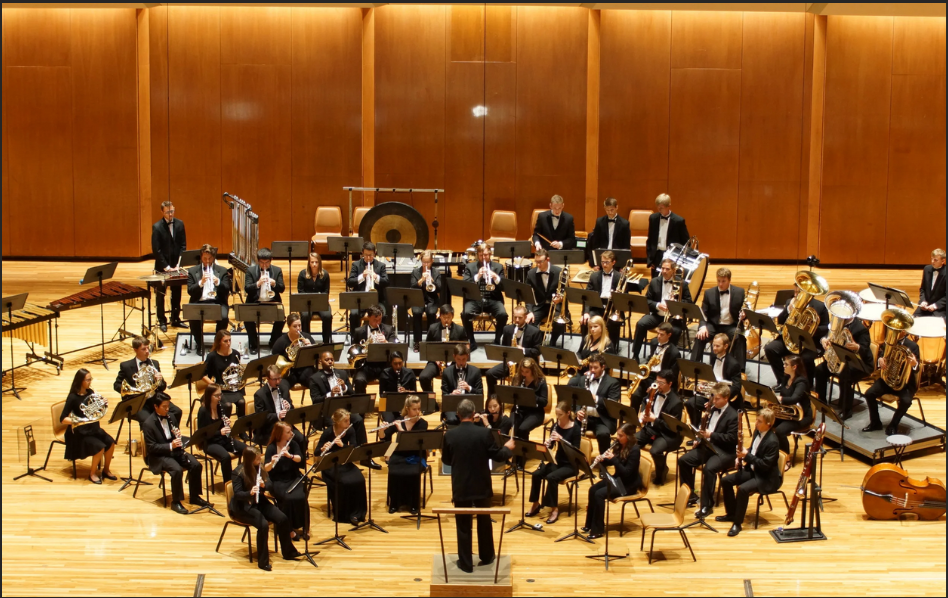
A wind orchestra. The percussion are curved around the back of the ensemble.
As a general rule, percussion instruments should be arranged in the following order from stage left to right:
Timpani
Timpani parts are frequently constructed around the tonic, subdominant, and dominant. As such, they serve a similar role to the rest of an ensemble’s bass section (tubas, trombones, doubles basses, etc.). Consequently, they should be placed far stage left or in the centre of the back line, with the rest of the percussion continuing on towards stage right.
Marching section
The heartbeat of any ensemble usually comprises the traditional marching percussion instruments: bass drum, crash cymbals, and snare drum. No surprises then that they’re usually kept next to each other - in fact, many composers will write their parts on the same sheet music!
Bass drum is first. It often shares similar beats or rhythms with timpani so it’s best to put them side by side. Bass drums are also traditionally played right-handed, thus placing the instrument on your left.
Cymbals is usually next, frequently playing together or on alternating beats with the bass drum. The closer these two instruments are to each other, the easier it is for them to sync up.
Last is snare drum. Snare is regularly the most intricate of rhythm parts. It will often lead the percussion section and have interplay with various instruments throughout a composition. Placing it closer to the centre of the ensemble allows the snare player to lock in with the conductor and drive from the middle.
Auxiliary and Rhythm
This next zone of the percussion section is more malleable, dependent on repertoire and what is needed where and by whom. Generally speaking, this is where you’ll find your tom toms, tambourines, triangles, castanets, woodblocks, hand drums, and the rest of the kitchen sink.
These set-ups are usually akin to a multi (a style of percussion repertoire where the performer plays multiple instruments at once). As such, this section requires the most planning to reduce the amount of instruments that need to be moved between pieces or the distance a percussionist needs to run to make an entry.
Mallet percussion
Last are the mallet percussion, comprising xylophone, glockenspiel, marimba, vibraphone, tubular bells and crotales. Mallet parts are often used to add colour to the melody line or a higher octave to the accompaniment. So placing them nearer the flutes, violins, piano, celeste, and/or harp on stage right allows these sections to hear each other better.
Mallet instruments are often written on the same part, so these can be arranged in any order to make entries and moving around the section as smooth as possible. That said, it’s common for the tubular bells to be the last percussion instrument in the back line. This is partly because tubular bells are traditionally played with the instrument on your right, angling your head over your left shoulder to see the conductor. However, it’s also due to how big tubular bells are. By placing them far to stage right you avoid blocking too many sight-lines of the percussion section, allowing them to play together more easily. From an audience perspective there is also a satisfying symmetry to the bookends created by the tubular bells on stage right and bass drum on stage left.
Well, that’s all for today. Take care and happy playing!